Tutorial
You can generate a Bookitit widget code to integrate it into your website by filtering the services you want your customers to book online independently. In this way, your clients will be able to make appointments with your center online in the easiest and fastest way possible.
In order for your clients to be able to access the booking widget, you will first have to configure it with your services and calendars that you want to offer. To do this, you must follow the following steps:
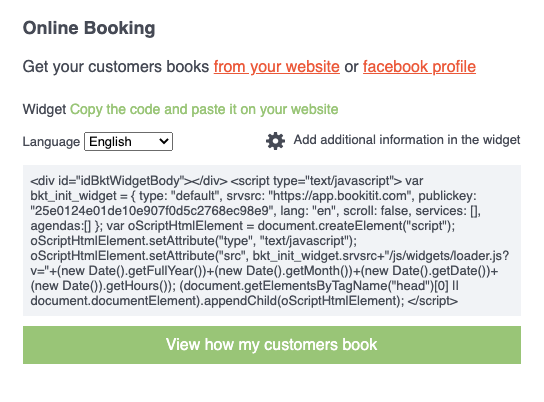
1. Access Online Booking from the Control Panel of your Bookitit account. Once inside, just above the “See how my clients book” button, you will see a code. Copy and paste it into a text document for easier editing.
Your online booking integration code will look something like this (the publickey is unique and different for each account):
<div id=»idBktWidgetBody»></div> <script type=»text/javascript»> var bkt_init_widget = { type: «default», srvsrc: «https://app.bookitit.com», publickey: «208bfcbdc0388cda1d305863a0e5bc68a«, lang: «es», scroll: false, services: [], agendas:[] }; var oScriptHtmlElement = document.createElement(«script»); oScriptHtmlElement.setAttribute(«type», «text/javascript»); oScriptHtmlElement.setAttribute(«src», bkt_init_widget.srvsrc+»/js/widgets/loader.js?v=»+(new Date().getFullYear())+(new Date().getMonth())+(new Date().getDate())+(new Date()).getHours()); (document.getElementsByTagName(«head»)[0] || document.documentElement).appendChild(oScriptHtmlElement); </script>

2. Between the square brackets ([]) that appear after “services”, you must enter all the BKT of the services you wish to offer, separated by an apostrophe or single quotation mark (‘). To find out what the BKT of the service is and how to find it, go to the end of step 2.
Example:
<div id=»idBktWidgetBody»></div> <script type=»text/javascript»> var bkt_init_widget = { type: «default», srvsrc: «https://app.bookitit.com», publickey: «208bfcbdc0388cda1d305863a0e5bc68a«, lang: «es», scroll: false, services: [‘bkt322399‘,’bkt322619′,’bkt322608′,’bkt322289′,’bkt322278′,’bkt322410′,’bkt322388’], agendas:[] }; var oScriptHtmlElement = document.createElement(«script»); oScriptHtmlElement.setAttribute(«type», «text/javascript»); oScriptHtmlElement.setAttribute(«src», bkt_init_widget.srvsrc+»/js/widgets/loader.js?v=»+(new Date().getFullYear())+(new Date().getMonth())+(new Date().getDate())+(new Date()).getHours()); (document.getElementsByTagName(«head»)[0] || document.documentElement).appendChild(oScriptHtmlElement); </script>
Each service has a BKT and you can find it in the list of services within Center Services in the Bookitit Control Panel. The BKT will appear next to each service in the Code column:

3. Next you will have to do the same with the calendars. Between the brackets ([]) that appear after “agenda”, you must enter all the BKT of the calendars that you want to appear at the time of the reservation separated by an apostrophe or single quotation mark (‘). To find out what the phonebook BKT is and how to find it, go to the end of step 3.
Example:
<div id=»idBktWidgetBody»></div> <script type=»text/javascript»> var bkt_init_widget = { type: «default», srvsrc: «https://app.bookitit.com», publickey: «208bfcbdc0388cda1d305863a0e5bc68a«, lang: «es», scroll: false, services: [‘bkt322399‘,’bkt322619′,’bkt322608′,’bkt322289′,’bkt322278′,’bkt322410′,’bkt322388’], agendas:[‘bkt156266′,’bkt156508′,’bkt156299′,’bkt156497′,’bkt156486’] }; var oScriptHtmlElement = document.createElement(«script»); oScriptHtmlElement.setAttribute(«type», «text/javascript»); oScriptHtmlElement.setAttribute(«src», bkt_init_widget.srvsrc+»/js/widgets/loader.js?v=»+(new Date().getFullYear())+(new Date().getMonth())+(new Date().getDate())+(new Date()).getHours()); (document.getElementsByTagName(«head»)[0] || document.documentElement).appendChild(oScriptHtmlElement); </script>
Like the services, each agenda has a BKT and you can find it in the list of agendas within My Calendars in the Bookitit Control Panel. The BKT will appear next to each planner in the Code column:

4. Once you have completed the previous steps, the final code with the modified services and calendars will be this (according to our example):
<div id=»idBktWidgetBody»></div> <script type=»text/javascript»> var bkt_init_widget = { type: «default», srvsrc: «https://app.bookitit.com», publickey: «208bfcbdc0388cda1d305863a0e5bc68a«, lang: «es», scroll: false, services: [‘bkt322399‘,’bkt322619′,’bkt322608′,’bkt322289′,’bkt322278′,’bkt322410′,’bkt322388’], agendas:[‘bkt156266′,’bkt156508′,’bkt156299′,’bkt156497′,’bkt156486’] }; var oScriptHtmlElement = document.createElement(«script»); oScriptHtmlElement.setAttribute(«type», «text/javascript»); oScriptHtmlElement.setAttribute(«src», bkt_init_widget.srvsrc+»/js/widgets/loader.js?v=»+(new Date().getFullYear())+(new Date().getMonth())+(new Date().getDate())+(new Date()).getHours()); (document.getElementsByTagName(«head»)[0] || document.documentElement).appendChild(oScriptHtmlElement); </script>
This code will be the one that will be integrated into your website. So now you just have to do is copy and paste it where you want it to appear.
