To configure the different texts of the e-mails and SMS that reach both the client and the center, go to E-mail and SMS Texts from the Bookitit Control Panel. Here you will find a list with all the types of notifications that the system has prepared. As you can see, they are separated by blocks: the first two for e-mail and the other two for SMS.
At the top of the list you will see four green buttons: Signature and Sender, Clients, My center and API. Selecting the “Clients” and “My center” button will change the recipient of the notifications.

Thus, if we select “Customers”, we will start configuring the notifications that will be sent to the customers:
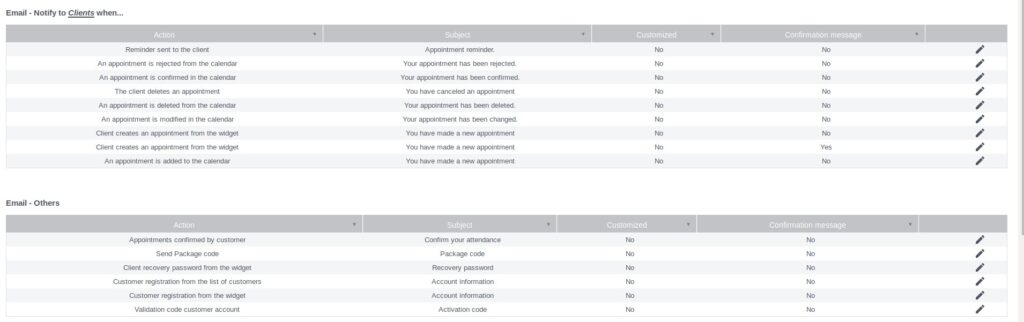
1. E-mail – Notify the customer when…
- Reminder sent to customer
- An appointment is rejected from the calendar
- An appointment is confirmed from the calendar
- Customer deletes an appointment
- An appointment is deleted from the calendar
- Change an appointment from the calendar
- Customer creates an appointment from the widget
- Customer creates an appointment without confirmation
- Customer creates an appointment with confirmation
2. E-mail – Other
- Send session voucher
- Customer registration from the customer list
- Client retrieves password from widget
- Customer registration from the widget
- Customer account validation code
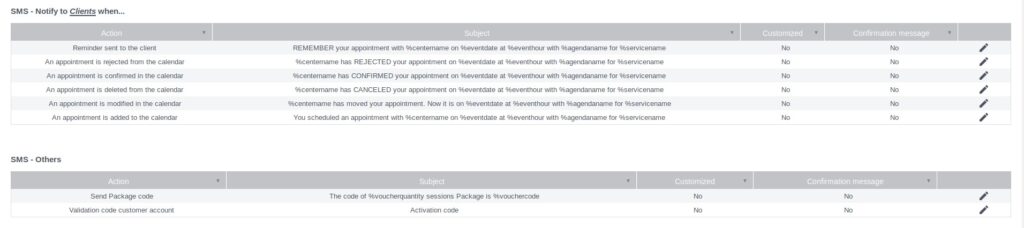
3. SMS – Notify the customer when…
- Reminder sent to customers
- An appointment is rejected from the calendar
- An appointment is confirmed from the calendar
- An appointment is deleted from the calendar
- Change an appointment from the calendar
- An appointment is added from the calendar
4. SMS – Other
- Send session voucher
- Customer account validation code
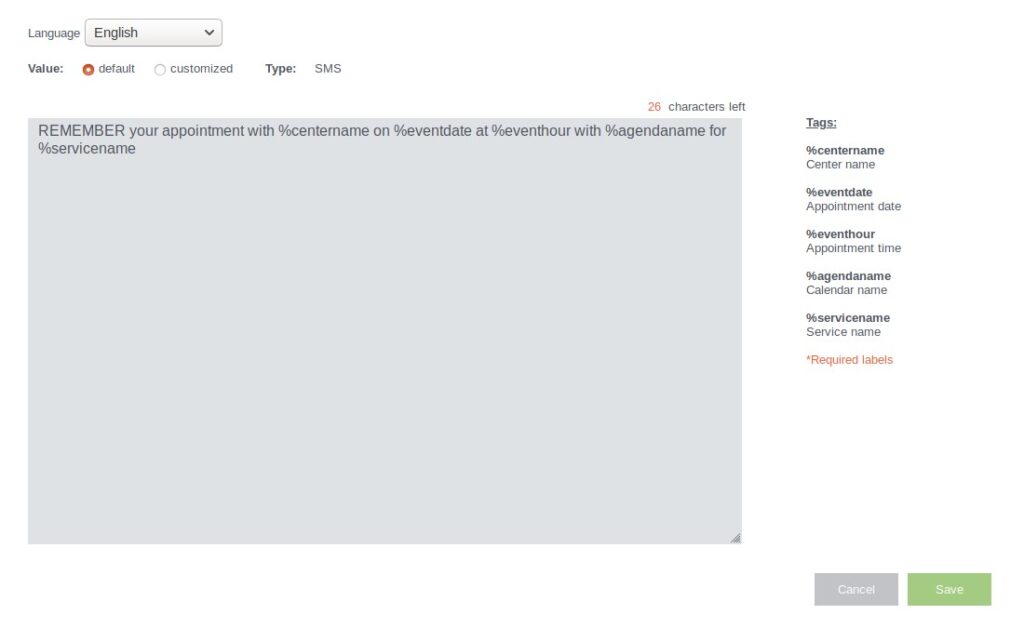
As for the configuration of the email notifications, enter each one of them and from the edit icon to the right of each one you will access a new screen from where you will make the configuration. You will be able to see that in each of them you can change the language of the notification from the drop-down next to “Language”. Below this, you will notice that you can leave the notification configured by default or customize it.
The labels that appear grouped in a column on the right are those corresponding to the information that will change according to the client, the service, the agenda, etc. That is to say, the label you see written on the notification will be automatically changed by the information that changes with each reservation: client’s name, telephone, e-mail, name of the service, date and time of the appointment, name of the agenda, etc.
If you leave the “default” box checked, the notification that will be sent is the one that appears in the box below, under “body”.
However, if you check the “custom” box, you will be able to edit the contents of this box. You can then enter the text of your choice and insert or remove the labels of your choice. For example, if you have customized the notifications for each service from the advanced settings in Center Services, include the %servicemailinfo label wherever you want it to appear in the body of the notification. In this way, when the client or the center receives the type of notification you are configuring, depending on the service contracted, the function of the label will be to change the content of the message.
Above the notification body box, you will see another box in which you can type the subject of the email.
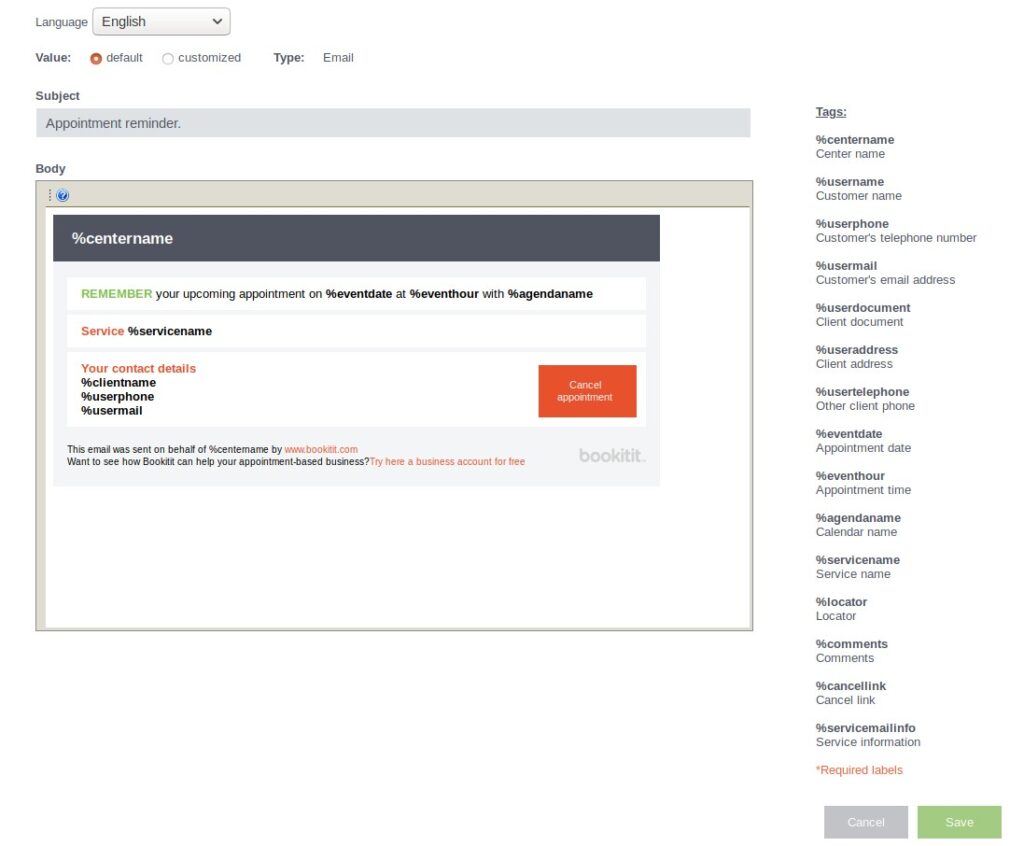
Before exiting, press the save button to successfully complete all settings.
The procedure for configuring the different types of SMS is the same as for e-mails. The only difference is that SMS do not have a subject as e-mails do.
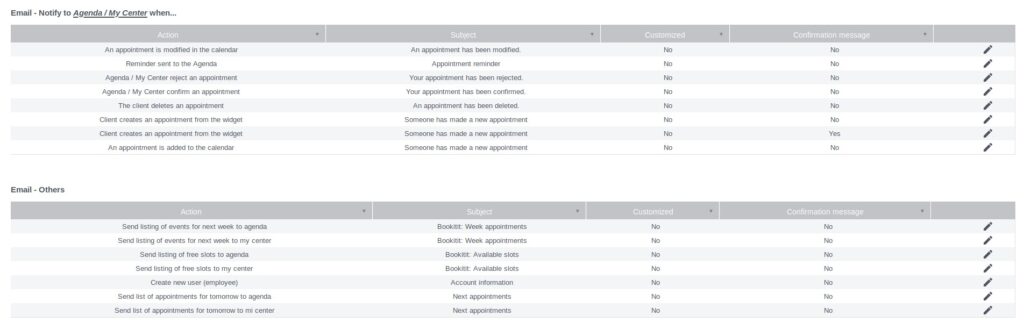
If we click on the My Center button, all the types of notifications that can be sent to the agenda or to the center will appear in the list, separated by blocks:
1. E-mail – Notify Agenda / My center when…
- Change an appointment from the calendar
- Reminder sent to the agenda
- Agenda/My center refuses an appointment
- Agenda/My center confirms an appointment
- Customer deletes an appointment
- Customer creates an appointment from the widget with confirmation
- Customer creates an appointment from the widget without confirmation
- An appointment is added from the calendar
2. E-mail – Other
- Send list with next week’s appointments to the agenda
- Send list with next week’s appointments to my center
- Send list of free slots to the agenda
- Send list of free slots to my center
- Create new user (employee)
- Send tomorrow’s appointment list to agenda
- Send tomorrow’s appointment list to my center
3. SMS – Notify Agenda / My Center when…
- Change an appointment from the calendar
- Reminder sent to the Agenda
- Agenda/My Center refuses an appointment
- Agenda/My Center confirms an appointment
- Customer deletes an appointment
- Customer creates an appointment from the widget
- Customer creates an appointment from the widget
- An appointment is added from the calendar

As before, if you wish to configure any type of notification, click on the edit button and make the modifications you consider necessary.
Next, we will proceed to the configuration of the notifications that are sent when the reservation or appointment is made from an API. To proceed with this configuration, click on the green API button.

Here, you will see again a list with the different types of notifications grouped in blocks when the customer has made a reservation from a system other than the Bookitit widget. In this way we will find:
1. API – E-mail to the customer
- Event created by API
2. API – SMS to customer
- Event created by API
- Modify phone by API
- Confirmation by API of social user account
- Confirmation by user account API
3. API – E-mail to Agenda / My Center
- Event created by API
4. API – SMS to Agenda / My Center
- Event created by API
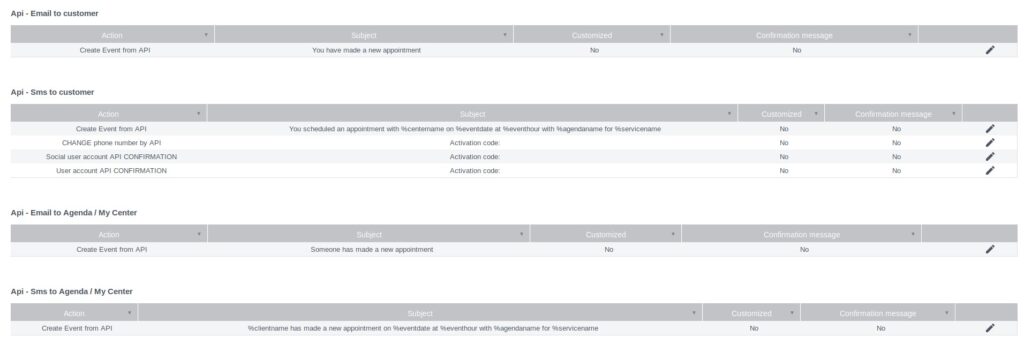
These notifications are configured in the same way as the previous ones.
If you want to customize the notifications for each of the services, follow these simple steps:
Go to “Center services” and select the service for which you want to customize the notification. Access the advanced settings of the service and at the bottom of the page write in the box the text you want to send to your customers and save it.
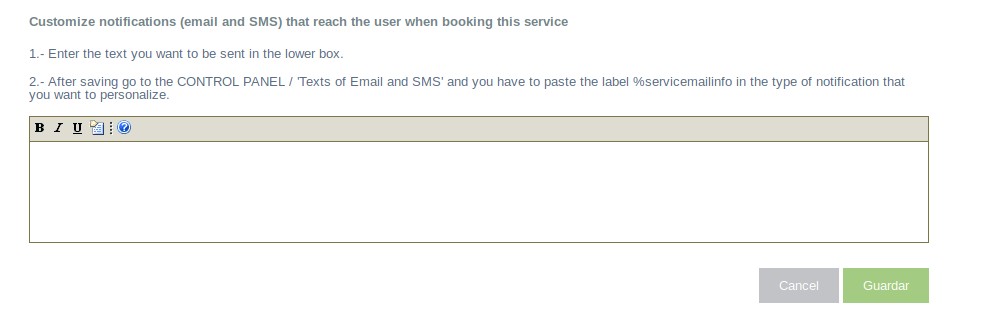
Perform this procedure for all the services you want. Then, go back to the Control Panel and go to E-mail and SMS Texts.
Once here, you will see a list of notification types. Choose one (or more) in which you want the text you have just customized to appear. Once you have chosen the type of notification, click on the edit icon, located at the bottom right, next to each type of notification.
You will be directed to a new screen. In the boxes at the top, check the “custom” box. The box below can then be edited. From the column of labels that appears on the right side, copy the second to last label (%servicemailinfo) and paste it where you want the text you have previously customized to appear.

Before exiting, press the save button so that all modifications are carried out correctly.
 Getting Started
 Schedule configuration
 Services Configuration
 Agendas Configuration
 Online Booking
 Manage the calendar
 Email and SMS notifications
 Holidays and blocking
 Customize sing and notifications
 Packages management
 Customers list
 Billing
 Payment gateway
 Synchronize with other calendars
 Appointment in advance and cancellation
 Confirmation of appointments
 Reports and statistics
 Worker access permits
 Validate online appointments
 Online reservations for members only
 My account information